 Skip to content
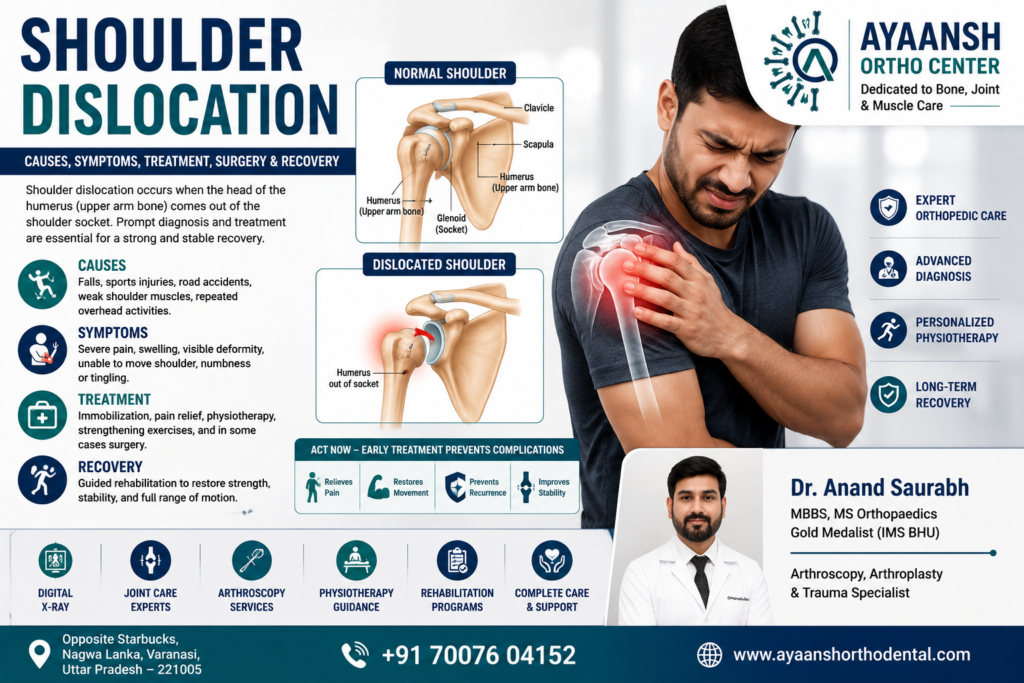
The shoulder is the most mobile joint in the human body. However, this incredible range of motion makes the joint highly unstable. Specifically, a shoulder dislocation is a very common orthopedic injury. It occurs when the upper arm bone pops out of the shoulder socket. Consequently, the injury causes immediate, intense pain. It also completely restricts arm movement. Therefore, patients require prompt medical care to avoid long-term joint damage.
If you are looking for effective shoulder dislocation treatment in Varanasi, getting an early professional evaluation is essential. At Ayaansh Ortho Center, our specialists provide personalized care to restore joint stability. In this article, we will examine the causes, symptoms, diagnostic steps, surgical options, and rehabilitation process for a dislocated shoulder.
What is a Shoulder Dislocation? Understanding the Anatomy
First, we must understand the anatomical structure of the shoulder. The shoulder is a ball-and-socket joint. Specifically, the round head of the upper arm bone (humerus) fits into a shallow socket in the shoulder blade (glenoid).
Additionally, a ring of tough, fibrous cartilage called the labrum surrounds the glenoid socket. This labrum deepens the socket. Consequently, it keeps the humerus head in place. Furthermore, strong ligaments, a fibrous joint capsule, and the rotator cuff muscles provide critical support. Indeed, these structures work together to maintain joint stability.
However, a sudden physical impact can overcome these supportive forces. When this happens, the humerus head separates completely from the glenoid socket. This event represents a complete shoulder dislocation. In contrast, a subluxation refers to a partial dislocation where the bone slips only halfway out of the socket.

Types of Shoulder Dislocation
Indeed, shoulder dislocations can occur in several directions. Orthopedic specialists categorize them into three main types based on the direction of the displacement.
1. Anterior Dislocation
First, anterior dislocation is the most common type. Specifically, this variation accounts for over 95% of all shoulder dislocations. During this injury, the humerus head slips forward and downward out of the socket. Usually, this happens when a person falls on an outstretched hand. Similarly, a blow to an outstretched arm can cause this displacement.
2. Posterior Dislocation
Second, posterior dislocation is less common. In this case, the humerus head moves backward behind the shoulder blade. Typically, this type occurs due to sudden muscle contractions. For example, seizures, electric shocks, or direct blows to the front of the shoulder can trigger this displacement.
3. Inferior Dislocation
Third, inferior dislocation is extremely rare. During this event, the humerus head slips downward. Consequently, the patient cannot lower their arm and must hold it pointing upward. This injury usually occurs due to severe downward traction on the arm.
Common Causes of Shoulder Dislocation
Generally, a significant physical force causes the shoulder joint to dislocate. Therefore, active individuals and athletes face a higher risk of this injury.
- Sports Injuries: High-impact contact sports present a major risk. For instance, football, rugby, basketball, and hockey players frequently dislocate their shoulders during collisions. Similarly, sports like wrestling and gymnastics can overstretch the joint.
- Falls: Falling onto a hard surface can easily displace the joint. Specifically, landing directly on the shoulder or on an outstretched hand can force the humerus out of its socket.
- Motor Vehicle Accidents: High-speed car, motorcycle, or bicycle collisions can apply immense force to the upper body. Consequently, these accidents often result in complex dislocations accompanied by fractures.
- Repetitive Overuse and Laxity: Some individuals have naturally loose ligaments, a condition called generalized joint laxity. Because of this, even minor daily tasks can cause their shoulders to slip out of place.

Recognizable Symptoms of a Dislocated Shoulder
When a shoulder dislocates, the symptoms are immediate, obvious, and severe. Consequently, you can easily recognize the injury.
- Visible Deformity: First, the shoulder looks visibly altered. It may appear squared-off, flat, or bulged rather than rounded.
- Intense, Sharp Pain: Second, the patient experiences immediate, excruciating pain. This pain is localized in the shoulder and upper arm area.
- Inability to Move the Arm: Third, the patient cannot move their arm in any direction. The arm is locked in an abnormal position.
- Swelling and Bruising: Fourth, localized swelling and bruising develop quickly around the joint tissues.
- Muscle Spasms: Fifth, severe muscle spasms often occur around the shoulder. This is the body’s natural attempt to protect the injured joint.
- Numbness and Tingling: Finally, the displaced bone can press on adjacent nerves. As a result, the patient may experience numbness, weakness, or a tingling sensation radiating down to the fingers.
Emergency First Aid: What You Must Do
To begin with, a dislocated shoulder is a medical emergency. Therefore, you must handle the injury with extreme care to prevent further complications.
1. Do Not Force the Bone Back
First, you must never try to force the bone back into the socket yourself. Attempting a self-reduction can damage the axillary nerve. It can also tear major blood vessels or fracture the humerus head. Consequently, only a trained healthcare professional should perform this procedure.
2. Immobilize the Arm
Second, keep the affected arm completely still. You can use a sling, a folded towel, or a splint to support the arm in its current position. This prevents further tissue damage and reduces pain.
3. Apply Ice
Third, apply an ice pack to the affected area. Ice helps control local swelling. It also numbs the sharp pain. However, do not apply ice directly to the skin. Always use a thin towel as a barrier.
4. Seek Immediate Medical Attention
Finally, visit an emergency room or an orthopedic clinic immediately. Fast treatment reduces the risk of long-term nerve damage. It also prevents joint stiffness.

Clinical Reduction: Restoring the Joint
At the hospital, the orthopedic surgeon will first evaluate your condition. Then, the specialist will perform a procedure called a closed reduction.
Specifically, the doctor uses gentle, controlled traction techniques to guide the humerus head back into the socket. However, the surrounding muscles are often tight due to protective spasms. Therefore, the doctor may administer a mild sedative, local anesthesia, or muscle relaxants before the reduction. As a result, the procedure becomes highly comfortable and safe.
Consequently, once the joint is back in place, the patient experiences immediate and significant pain relief. Subsequently, the doctor takes post-reduction X-rays. These images confirm the proper placement of the bone. They also check for any hidden fractures.
Potential Complications of Shoulder Dislocation
Indeed, a dislocation does not merely displace the bones. It also stretches or tears the surrounding soft tissues. Therefore, several complications can arise from this injury.
1. Bankart Lesions
First, a Bankart lesion occurs when the humerus head tears the lower part of the labrum. This lesion is highly common in young patients. Because the labrum does not heal easily on its own, a Bankart lesion often leads to chronic joint instability.
2. Hill-Sachs Lesions
Second, during a dislocation, the humerus head collides with the edge of the glenoid bone. Consequently, this collision causes a compression fracture or indentation on the back of the humerus head. This structural defect is called a Hill-Sachs lesion.
3. Rotator Cuff Tears
Third, the force of the dislocation can tear the rotator cuff tendons. This is particularly common in patients over the age of 40. If you suspect this issue, read our detailed guide on Rotator Cuff Tear Recovery to understand its management.
4. Nerve Damage
Fourth, the displaced humerus head can stretch the axillary nerve. This nerve supplies the deltoid muscle and provides sensation to the outer shoulder. Fortunately, most nerve injuries are temporary. They resolve within a few weeks as the nerve recovers.
5. Chronic Instability
Finally, recurrent dislocations can occur if the ligaments remain stretched and loose. Over time, this chronic instability can damage the joint cartilage. Consequently, this damage can lead to premature joint wear. If you also suffer from neck pain, check our guides on Cervical Spondylosis Treatment and Slip Disc Management to rule out referred upper body pain.

Diagnostic Evaluation and Tests
To formulate an effective treatment plan, an orthopedic surgeon must perform a detailed diagnostic assessment.
- Comprehensive Physical Exam: First, the doctor checks your range of motion. He also assesses muscle strength and tests nerve reflexes in the hand and fingers.
- Digital X-rays: Second, X-rays are the primary tool used to confirm the dislocation direction. They also help identify any associated bone fractures.
- MRI Scan: Third, the specialist recommends an MRI scan after the reduction. Specifically, an MRI helps visualize soft tissues like the labrum, ligaments, and rotator cuff.
- CT Scan: Finally, if the doctor suspects significant bone loss on the humerus head or glenoid, a CT scan is highly useful. This scan provides detailed 3D views of the bone structure.
Non-Surgical Treatment Options
To begin with, most first-time, low-demand patients can recover successfully with conservative management.
1. Immobilization
Initially, the patient wears a specialized shoulder sling for 2 to 3 weeks. This immobilization keeps the arm still. Consequently, it allows the stretched ligaments and the joint capsule to begin the healing process.
2. Medications
Additionally, the doctor prescribes oral anti-inflammatory drugs (NSAIDs) or pain relievers. These medications effectively reduce swelling. They also manage discomfort during the initial recovery phase.
3. Progressive Physical Therapy
Furthermore, once the sling is removed, a structured physical therapy program begins. Initially, the therapist guides the patient through gentle range-of-motion exercises. Subsequently, the focus shifts to strengthening the rotator cuff and shoulder blade muscles. Consequently, these strong muscles help compensate for any loose ligaments. They stabilize the joint naturally.
Surgical Treatment: When is it Necessary?
However, non-surgical treatment is not always sufficient. Specifically, some patients require surgical stabilization to restore long-term joint function.
Indications for Surgery:
- Recurrent Dislocations: If the shoulder continues to dislocate during daily activities or minor movements.
- Young Athletes: Young, active individuals have an extremely high risk of re-dislocation. Therefore, early surgery is often recommended to prevent chronic joint damage.
- Large Labral or Rotator Cuff Tears: When diagnostic imaging reveals a severe Bankart lesion or a full-thickness rotator cuff tear.
- Significant Bone Loss: When a large portion of the glenoid socket or humerus head has worn away.
Common Surgical Procedures:
- Arthroscopic Bankart Repair: First, this is a minimally invasive keyhole surgery. The surgeon uses tiny incisions and a camera. Then, using special anchors, the surgeon reattaches the torn labrum to the glenoid bone. Consequently, this procedure restores the natural socket depth.
- Open Latarjet Procedure: Second, if there is significant bone loss in the glenoid socket, open surgery is necessary. The surgeon transfers a small piece of bone from another part of the shoulder blade to the front of the socket. Consequently, this bone graft restores the lost socket bone. It prevents forward dislocations.

Step-by-Step Rehabilitation and Exercises
Indeed, a successful recovery depends heavily on your dedication to physical therapy. The rehabilitation process progresses through distinct, carefully planned phases.
Phase 1: Passive Motion and Protection (Weeks 1–4)
During this early phase, the main goal is to protect the healing tissues. It also helps prevent joint stiffness.
- Pendulum Exercises: Lean forward and support your healthy arm on a table. Let your injured arm hang straight down. Gently swing your arm in small circular motions. This exercise promotes joint fluid circulation without straining the muscles.
- Elbow and Wrist Range of Motion: Regularly flex and extend your elbow, wrist, and fingers. This maintains circulation and prevents stiffness in the lower arm.
Phase 2: Active-Assisted Movements (Weeks 5–8)
Once the tissue gains initial strength, you can begin moving the joint actively with gentle assistance.
- Wand Exercises: Hold a light stick or wand with both hands. Use your healthy arm to gently push your injured arm upward and outward. This assists your shoulder in reaching a wider range of motion safely.
- Wall Crawls: Stand facing a wall. Gently use your fingers to “crawl” up the wall. Lift your arm as high as comfortable. Repeat this facing sideways to improve outward rotation.
Phase 3: Rotator Cuff Strengthening (Weeks 9–12)
During this phase, the primary focus is on building muscle strength to stabilize the joint.
- Internal Rotation with Resistance Bands: Anchor a resistance band to a doorknob. Hold the band with your injured arm. Keep your elbow tucked close to your side at a 90-degree angle. Gently pull your hand across your stomach. Repeat 15 times for 3 sets.
- External Rotation with Resistance Bands: Hold the band. Pull your hand outward, away from your body. Keep your elbow pinned to your side. This targets the stabilizing infraspinatus and teres minor muscles.
If you also struggle with stiffness or lower body issues, you can explore our resources on Knee Pain Treatment or Sciatica Pain Management to stay active during your upper-body recovery.
Prevention and Long-Term Joint Care
To prevent future dislocations, you must take specific, proactive steps to protect your shoulder joint.
- Maintain Rotator Cuff Strength: Continue performing resistance band exercises even after your shoulder heals. Strong muscles are the best defense against instability.
- Avoid High-Risk Positions: Avoid overhead lifting with your arm extended backward. This position puts maximum stress on the anterior joint capsule.
- Wear Protective Gear: Always wear appropriate shoulder pads or braces during contact sports.
- Focus on Core and Scapular Stability: A strong back and core provide a stable base for shoulder movements. Consequently, this reduces overall joint strain.
Expert Care at Ayaansh Ortho Center in Varanasi
If you need advanced shoulder dislocation treatment in Varanasi, visiting a specialized orthopedic clinic is crucial. Ayaansh Ortho Center, located opposite Starbucks, Nagwa Lanka, Varanasi, offers expert care for sports injuries, joint dislocations, complex fractures, and arthritic conditions.
Dr. Anand Saurabh (MBBS, MS Orthopaedics), a prestigious Gold Medalist from IMS BHU with over 10 years of clinical experience, specializes in arthroscopy, trauma care, joint reconstruction, and regenerative medicine. At our center, we provide personalized treatment plans. These plans are tailored to help you regain full joint function, relieve pain, and return to your active lifestyle safely.
Do not let joint instability compromise your daily life. If you require expert consultation or a second opinion on a joint condition, Contact us today to schedule an appointment.
Related Articles
- Frozen Shoulder: Causes, Symptoms & Treatment
- Shoulder Impingement Syndrome Overview
- Tennis Elbow Treatment in Varanasi
